While the screens that come with even mid-range laptops have a pretty decent resolution and 720P HD (if not full 1080P HD) capabilities, they are quite small. The screens of most laptops today do not exceed 15.6” in size (measured diagonally), and while that is more than enough for the solo media viewer, it might be a deal breaker for users who like to view media with an entire group of people and users who simply prefer a larger display even if they are viewing media alone. Thankfully, the average laptop can be connected to the typical television, allowing whatever is being displayed on the laptop’s screen to be ported to and also be displayed on the TV in real time. Now there are a lot of different ways using which you can connect a laptop to a computer, but seeing as though every laptop out there (regardless of what decade it’s from) is bound to have either an HDMI or VGA port, I’ll be discussing those as your top choices. The following are some of the most effective and easiest ways you can connect a laptop to a television:
Method 1: Connect your laptop to a TV using HDMI
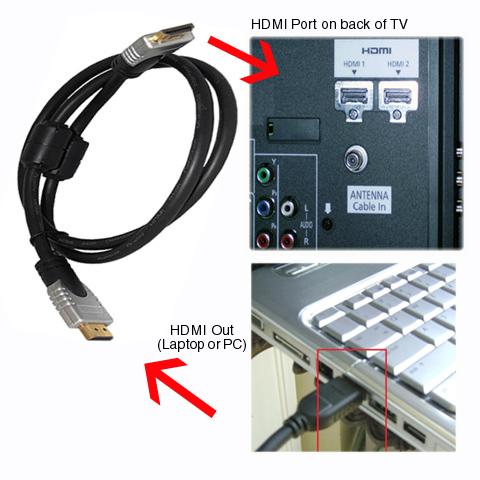
HDMI (High-Definition Multimedia Interface) is without question the simplest, most common and cleanest looking option when it comes to connecting a laptop to a computer. HDMI was the first perfect connectivity option ever created that was capable of sending digital signals instead of analog ones, which is why it became all the rage back in 2005 and is still the most sought after connectivity option on the planet. Basically all laptops that were manufactured after 2007 come with built-in HDMI out ports. An HDMI port basically looks like a slimmer and longer version of a USB port and is almost always labeled, so don’t worry about remembering what one looks like. If that is the case with the laptop you want to connect to a TV, establishing a connection will be extremely simple. All you need to do is get your hands on an HDMI cable (even a cheap one will do), insert one end of the HDMI cable into the laptop’s HDMI out port, and insert the other end into your television’s HDMI in port. Your television is likely to have more than one HDMI in port, so remember which port you inserted the cable into as this will allow you to choose the right HDMI output channel on the TV. To top it all off, since an HDMI connection sends digital signals, it is also capable of transmitting sound, which means that one HDMI cable will serve both your video AND audio needs and that you won’t have to establish yet another connection between the laptop and the TV to get audio along with video.
Method 2: Establish a VGA connection
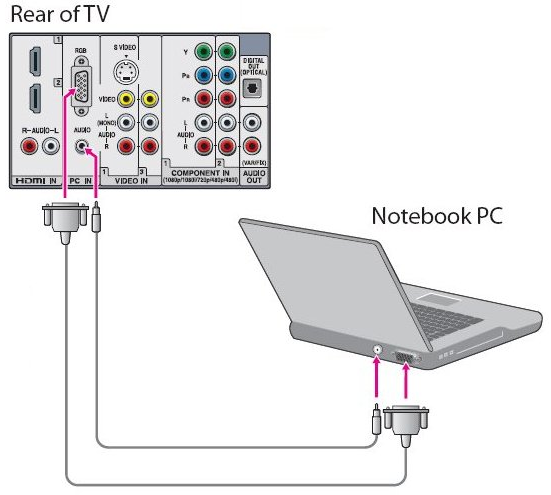
If the laptop you are trying to connect to a TV was manufactured before 2007, you may not be very lucky and you may have to connect it to the TV using a VGA cable. Almost all laptops that don’t have HDMI out ports have VGA out ports. Both a VGA out port and a VGA in port look the same – somewhat rectangular with 15 pins divided into 3 rows of 5. All you need to do to establish a VGA connection between a laptop and a TV is get a VGA cable, connect one of its ends to the laptop and insert the other into the RGB in port (sometimes dubbed the PC in port or the VGA in port). A VGA connection transmits analog signals, which means that you are bound to suffer from a loss of media quality if you have to go the VGA route when connecting a laptop to a computer. In addition, a VGA connection will also not transmit audio, so if you want audio when viewing media, you are going to have to get a connector with a 3.5mm head on both ends, connect one end into the laptop’s 3.5mm headphone jack and the other into the TC’s 3.5mm headphone/Audio in jack.
Method 3: Connect your laptop to a TV wirelessly
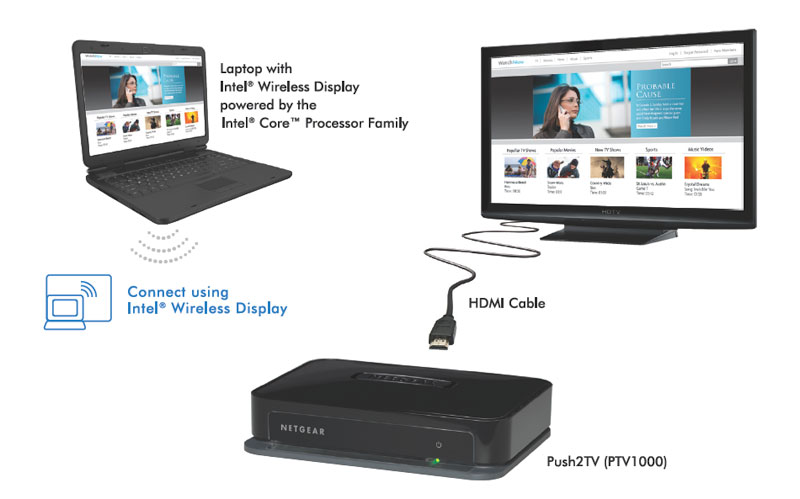
If you prefer an extremely clean look and a wireless, hassle-free connection between your laptop and your TV, the best option for you would be to swing for a wireless set-top box capable of transmitting audio and video signals from the laptop to the TV wirelessly over your WiFi network. One of the best options when it comes to such devices is the Netgear Push2TV, but there are plenty of alternatives, so just be sure to purchase whatever suits both your needs and budget. Such devices can be connected to a TV unit via HDMI and then transmit both audio and video from a laptop to the TV wirelessly when both the device and the laptop in question are connected to the same WiFi network. Since the connection is wireless, you should not expect to be able to play ultra high performance video such as 4K video without any jitters or lag, but you will definitely be able to play 1080P full HD video seamlessly.
Getting the TV to display what the laptop is displaying
Hooking the laptop up to the TV may be the hard part, but the process doesn’t end here. To actually get the TV to display what the laptop is displaying, you are going to first have to get your TV to use the laptop connection. If your TV informs you of the new connection when you connect the laptop to it, choose to start using the connection, and it will switch to the dedicated channel for that connection. If you are using an HDMI connection and no prompt shows up on the television, simply switch the TV to the HDMI channel for the HDMI connection you established. Once the TV has started using the laptop connection, you are going to have to press Windows Logo key + P on your laptop and then select Duplicate to get the TV’s screen to display exactly what the laptop is displaying.
Fix: Laptop Beeps 8 Times during StartupHow to Fix Your Laptop’s Touchpad Not WorkingFix: Laptop Speakers CracklingFix: Laptop Screen Flickering


